
Map Install tutorial
Worms 4 and Ultimate Mayhem tweaking mods :: 3D PC games // Tweaking that we major in :: Worms 4 mayhem :: Tweaking Tutorials
Page 1 of 2 • 1, 2 ![]()

Map Install tutorial
![]() by Dzani Thu Dec 24, 2009 4:35 pm
by Dzani Thu Dec 24, 2009 4:35 pm
Default option
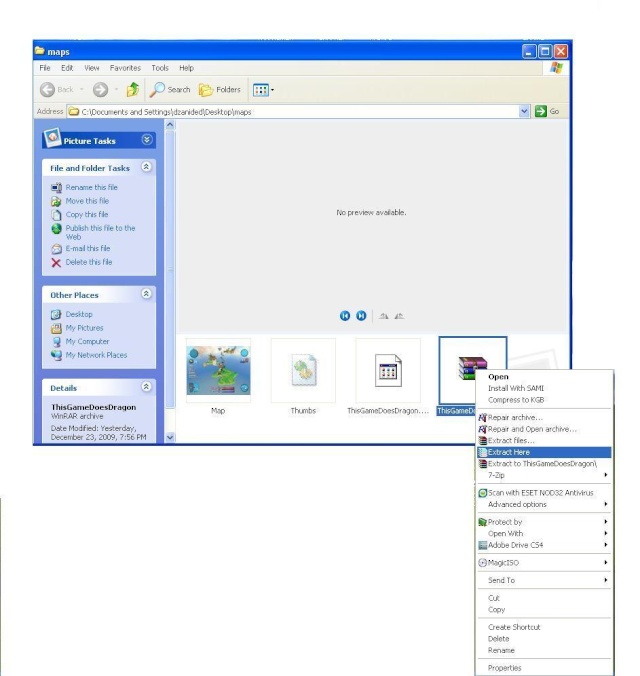
First of all, download the map you want. For example, download ThisgamedoesDragon.xan map from here
http://www.megaupload.com/?d=QT9GZI7P
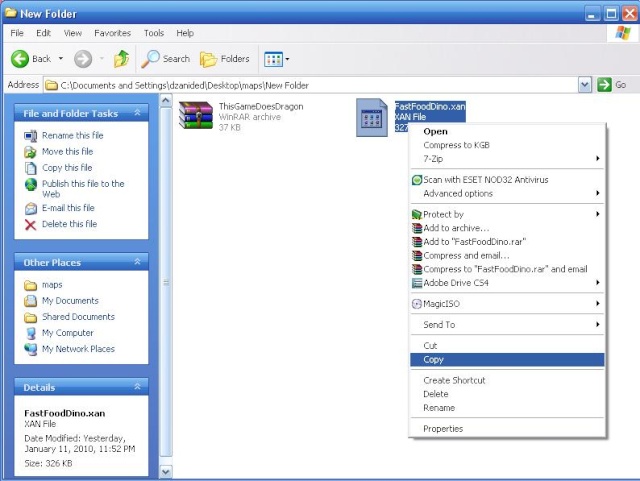
After you have downloaded, extract the map using Winrar somewhere in computer ( I recommend on Desktop , so you can see it immediately)
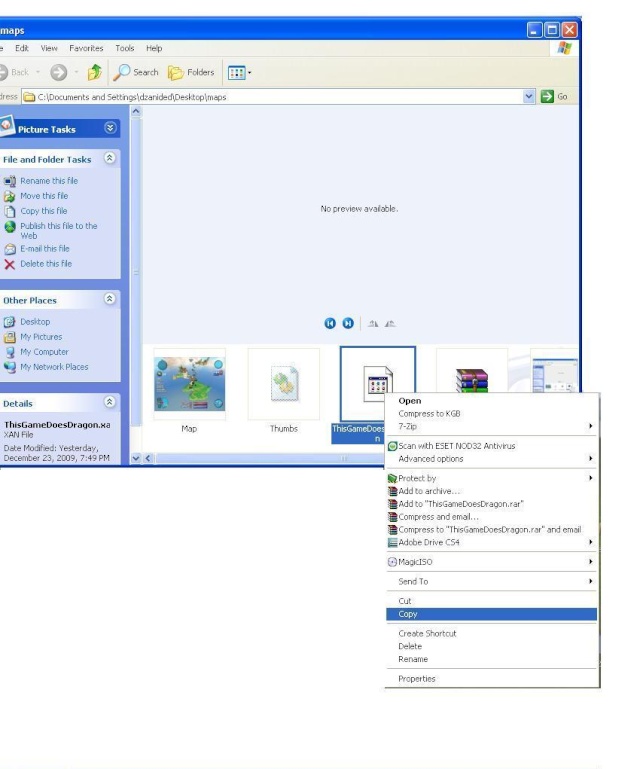
Then copy map ( In this example , map is called ThisgamedoesDragon.xan) to Worms 4 mayhem/Data/Maps folder. ( Folder Where you Installed Worms)
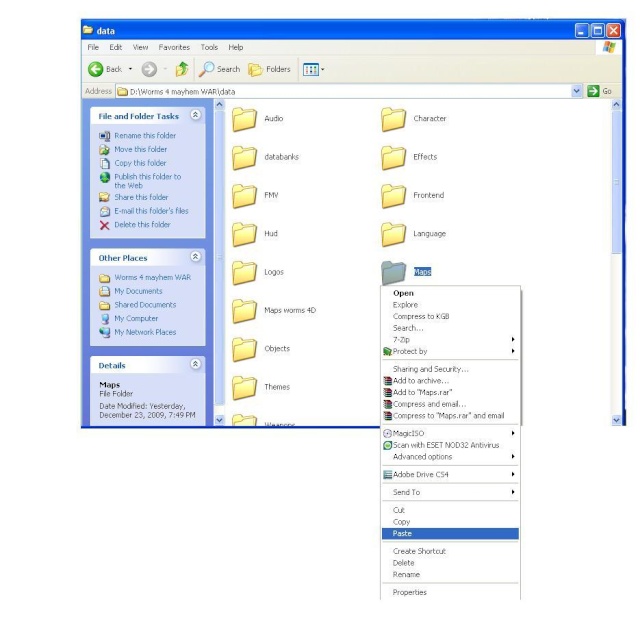
Map will replace existing This game does Dragon map with downloaded one.
So, make sure you back up your old map files.
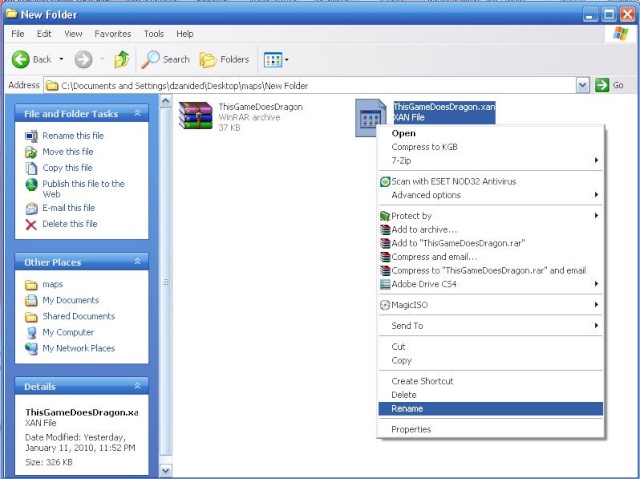
But if you want to replace other map than ThisgamedoesDragon.xan you will have to rename it to map you want to replace.
If you look in your Data/Maps folder you will see a lot of maps.

You can replace your downloaded with any of these. I marked FastFoodDino.xan. So, if you want to replace this map rename your downloaded Thisgamedoesdragon.xan to FastFoodDino.xan.and copy it to Data/Maps where you installed worms.
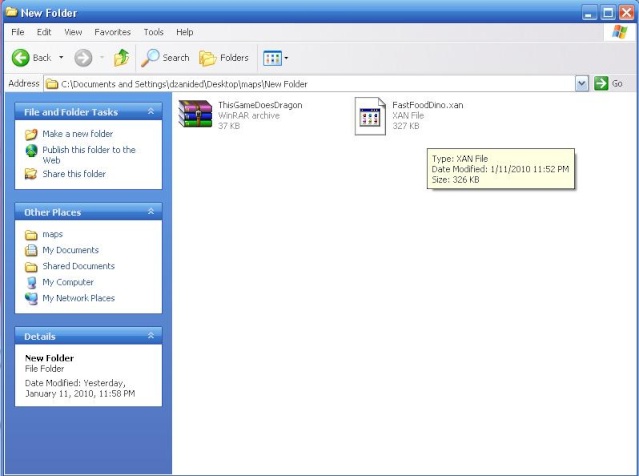
Now your map will replace FastFoodDino.xan map in game.
You will know if you can replace downloaded map with another one if it says that it's selectable.
UPDATE :
I will show you 3 Options by which you can add maps without replacing existing ones.
Option 1 :
In this discussion you'll find an interesting program: the map list editor. It allows you to add new maps into Worms 4 Mayhem without replacing the previous ones.
IMPORTANT: When you'll start wormsmaplist, you'll see that it is all in Russian! No problem: just press CTRL+L and open the file En.ing that is in the same folder of the wormsmaplist editor.exe! Once you've done it, close and reopen Wormsmaplisteditor again! Surprise: the program is in English

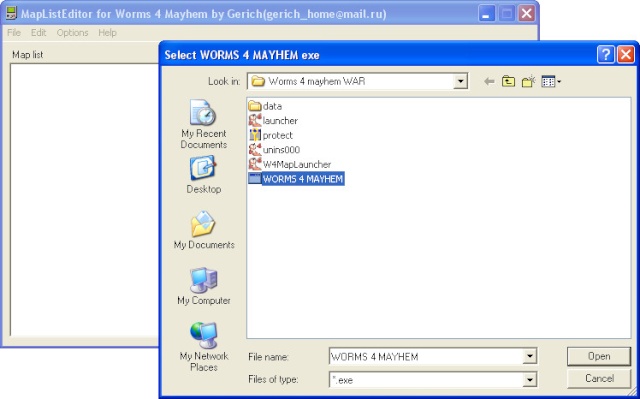
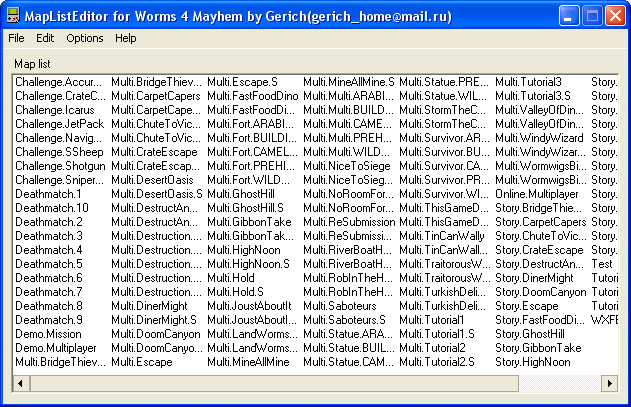
To edit map list click File->Open and select WORMS 4 MAYHEM exe. After that you will see a list of all maps(not only for multiplayer). To add new map click Edit->Add and enter the name of map. To delete map click Edit->Delete. To edit map info double click on map. You will see a window with a several textboxes. Fill them, select map file, image, scripts and press ok. When all is done click File->Save
http://files.filefront.com/W4MapListEditorrar/;13846829;/fileinfo.html
Option 2 :
How Add Map in Worms 4 list:
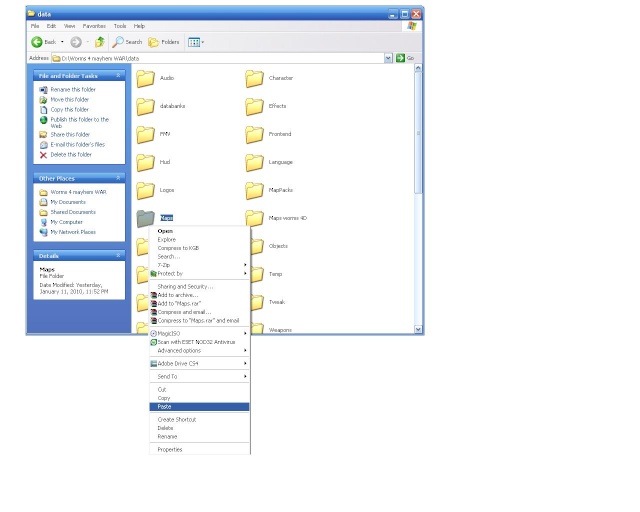
1. in folder data/maps/ put yourmap.xom, yourhmap.hmp, yourtexturelist.txt
2. in folder data/databanks/ put yourdata.xml
<?xml version='1.0' ?>
<xomArchive>
<xomObjects>
<XDataBank id='id-0'>
<Section>0</Section>
<UintResources href='Databank.CustomDetailBank'/>
<UintResources href='Databank.CustomTextureBank'/>
<StringResources href='Databank.MaterialFile'/>
<StringResources href='Databank.Theme'/>
<StringResources href='Databank.Theme'/>
<StringResources href='Databank.TimeOfDay'/>
<StringResources href='Heightmap.BaseTexture'/>
<StringResources href='Heightmap.SecondTexture'/>
</XDataBank>
<XUintResourceDetails id='Databank.CustomDetailBank'>
<Value>1</Value>
<Name>Databank.CustomDetailBank</Name>
<Flags>72</Flags>
</XUintResourceDetails>
<XUintResourceDetails id='Databank.CustomTextureBank'>
<Value>6</Value>
<Name>Databank.CustomTextureBank</Name>
<Flags>72</Flags>
</XUintResourceDetails>
<XStringResourceDetails id='Databank.MaterialFile'>
<Value>Maps\yourtexturelist.txt</Value>
<Name>Databank.MaterialFile</Name>
<Flags>64</Flags>
</XStringResourceDetails>
<XStringResourceDetails id='Databank.Theme'>
<Value>BUILDING</Value>
<Name>Databank.Theme</Name>
<Flags>64</Flags>
</XStringResourceDetails>
<XStringResourceDetails id='Databank.TimeOfDay'>
<Value>NIGHT</Value>
<Flags>64</Flags>
</XStringResourceDetails>
<XStringResourceDetails id='Heightmap.BaseTexture'>
<Value>C01</Value>
<Name>Heightmap.BaseTexture</Name>
<Flags>64</Flags>
</XStringResourceDetails>
<XStringResourceDetails id='Heightmap.SecondTexture'>
<Value>C03</Value>
<Name>Heightmap.SecondTexture</Name>
<Flags>64</Flags>
</XStringResourceDetails>
</xomObjects>
3. change scripts.xml file in folder data/Tweak
<?xml version='1.0' ?>
<xomArchive>
<xomObjects>
<XDataBank id='id-0'>
<Section>0</Section>
...
<ContainerResources href='yourIDMAP'/>
<StringResources href='txt.yourMapName'/>
...
</XDataBank>
...
<XContainerResourceDetails id='yourIDMAP'>
<Value href='yourMapID-0'/>
<Name>YourMapName</Name>
<Flags>80</Flags>
</XContainerResourceDetails>
<WXFE_LevelDetails id='yourMapID-0'>
<Frontend_Name>txt.yourMapName</Frontend_Name>
<Frontend_Briefing></Frontend_Briefing>
<Frontend_Image>YourIcon.tga</Frontend_Image>
<Level_ScriptName>stdvs,wormpot</Level_ScriptName>
<Level_FileName>YourFileBaseName</Level_FileName>
<Objectives></Objectives>
<Level_Number>6</Level_Number>
<Level_Type>0</Level_Type>
<Lock></Lock>
<Theme_Type>5</Theme_Type>
<Preview_Type>0</Preview_Type>
<BonusTime>165</BonusTime>
</WXFE_LevelDetails>
<XStringResourceDetails id='txt.yourMapName'>
<Value>YourMapName</Value>
<Name>txt.yourMapName</Name>
<Flags>64</Flags>
</XStringResourceDetails>
...
It should work, good luck!!!
Use this method with Worms 4 Map launcher from Alex Bond, located here
https://worms4mayhem.forumotion.com/worms-4-mayhem-f1/w4maplauncher-v1085-launcher-worms-3d-maps-for-worms4-t29.htm
Option 3 :
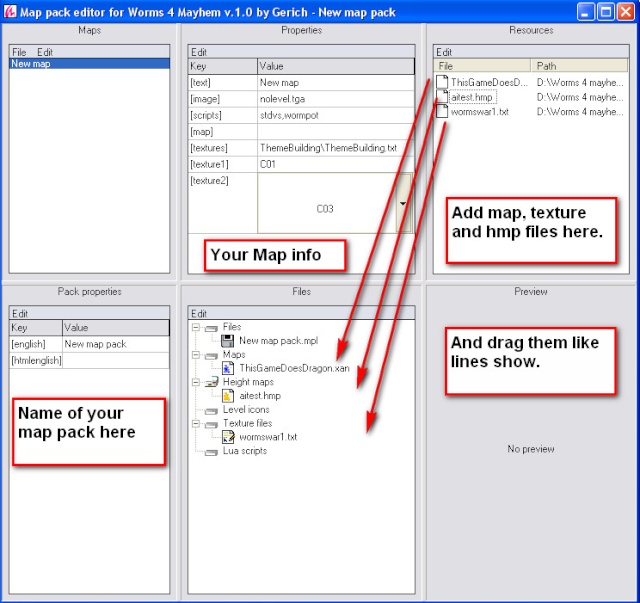
Use gerichs map pack launcher and map pack editor to create map packs and load them with special launcher.
Find them here https://worms4mayhem.forumotion.com/worms-4-mayhem-f1/gerichs-map-packs-t60.htm
First install both applications.
Use map pack editor to create your map pack. Picture below shows how you should do it. After you have done it, press File - Save map pack.
Save .exe file in Worms 4 Mayhem folder (recommended) and program will automatically create.mpl file in its installation directory.
Default one is C:\Program Files\W4MapPackEditor\iscc\maplists .
Next, open map pack launcher and select .mpl file of your map pack.
And yeah, play the game.
See pictures below for more info.

If you have questions feel free to post them here and we will help.
How to create images for your new maps coming soon !
Last edited by Dzani on Mon Aug 09, 2010 12:59 pm; edited 10 times in total

Dzani- Admin

- Posts : 575
Activity Points : 953
Reputation : 87
Join date : 2008-01-10 -

Re: Map Install tutorial
![]() by Fireworm Thu Feb 04, 2010 11:52 pm
by Fireworm Thu Feb 04, 2010 11:52 pm
_________________________________________________________________________________________________________________________________
As requested by Dzani here is a tutorial on how to make a hmap
1st off to even do a height map even for your own map you need to open one already made.
(you can copy and paste carpet capers for your map because it is completely blank)
So open your map or a map you want to change then in the file drop down menu click open height map.

Height maps are located in you data/maps folder. For this tutorial I will choose the map Rob In the Hood.

Before I forget you should also have the water turned on so you can see the water level.

Once you open it and you have the textures loaded you might see the textures aren't right, thats alright, it is normal because the editor doesn't show some textures right. Like shown here for me.

Now if you didn't select anything you should have this on the side (if you did deselect it you can always reselect it).

If you are doing a map already done, in the height map drop down in the picture above go to import because the contrast on export is 100 and will look like this

You don't want that, you want the contrast set to 0. After changing the contrast to 100 press the print screen button on your keyboard. (for those who don't know print screen takes a snapshot of your screen and puts it in the clipboard)

Now go edit the picture, you can use mspaint for this but I prefer Paint.net. The hmap picture only uses grayscale so if you use colors it will convert to grayscale. Ok, when your done press the button that says open image and select your height map image. And then put the contrast back to 0. If you use paint.net you can put blur beforehand so then the slopes will be even smother. This is my changes.

You can change the max and min values, but if I remember if you put the max value to high you start walking in the ground as in, walking under the surface of the height map. The max value is for white and min value is for black. I put my max value to 0.900 and my min to 0.100 I get this my final result.

Oh and the reason why the height map is a different texture now then from the beginning is because I closed the program and opened it back up.
Here is the download link for paint.net if you want it but don't have it.
Last edited by Iceworm on Thu Apr 01, 2010 1:56 am; edited 2 times in total
Fireworm- Standard Member
- Posts : 493
Activity Points : 622
Reputation : 88
Join date : 2010-01-27
Age : 29
Re: Map Install tutorial
![]() by Dzani Fri Feb 05, 2010 11:29 pm
by Dzani Fri Feb 05, 2010 11:29 pm
Dzani- Admin
- Posts : 575
Activity Points : 953
Reputation : 87
Join date : 2008-01-10 -
Re: Map Install tutorial
![]() by Fireworm Sat Feb 06, 2010 3:38 am
by Fireworm Sat Feb 06, 2010 3:38 am
And the E isn't red in the word update
Fireworm- Standard Member
- Posts : 493
Activity Points : 622
Reputation : 88
Join date : 2010-01-27
Age : 29
Re: Map Install tutorial
![]() by yhassine Fri Jul 02, 2010 2:10 am
by yhassine Fri Jul 02, 2010 2:10 am
So i got both the 250 maps and the alex bond launcher. To add the 250 maps how do i do so? You wrote how but the only files in the 250 pack folder are xan and text (you didnt list anything about those).
Thank you
yhassine- Standard Member
- Posts : 5
Activity Points : 5
Reputation : 0
Join date : 2010-07-02
Re: Map Install tutorial
![]() by Dzani Fri Jul 02, 2010 8:58 am
by Dzani Fri Jul 02, 2010 8:58 am
Just follow option 2. It is a bit tricky, it would be a lot easier if you used Gerichs map launcher. Anyway, if you have more questions post.
Dzani- Admin
- Posts : 575
Activity Points : 953
Reputation : 87
Join date : 2008-01-10 -
Re: Map Install tutorial
![]() by yhassine Mon Jul 05, 2010 2:32 am
by yhassine Mon Jul 05, 2010 2:32 am
yhassine- Standard Member
- Posts : 5
Activity Points : 5
Reputation : 0
Join date : 2010-07-02
Re: Map Install tutorial
![]() by yhassine Fri Jul 09, 2010 1:45 am
by yhassine Fri Jul 09, 2010 1:45 am
yhassine- Standard Member
- Posts : 5
Activity Points : 5
Reputation : 0
Join date : 2010-07-02
Re: Map Install tutorial
![]() by Dzani Fri Jul 09, 2010 9:46 am
by Dzani Fri Jul 09, 2010 9:46 am
When you are done in Gerichs map pack select File - Save Map pack. Save .exe file somewhere and program will automatically create .mpl
file in C:\Program Files\W4MapPackEditor\iscc\maplists ( that is default directory ) - or other directory depending where you installed it.
However, in option 2 you can create as much maps as you want.

Dzani- Admin
- Posts : 575
Activity Points : 953
Reputation : 87
Join date : 2008-01-10 -
Re: Map Install tutorial
![]() by yhassine Fri Jul 09, 2010 9:25 pm
by yhassine Fri Jul 09, 2010 9:25 pm
yhassine- Standard Member
- Posts : 5
Activity Points : 5
Reputation : 0
Join date : 2010-07-02
Re: Map Install tutorial
![]() by yhassine Fri Aug 06, 2010 7:40 am
by yhassine Fri Aug 06, 2010 7:40 am
thanks in advance
yhassine- Standard Member
- Posts : 5
Activity Points : 5
Reputation : 0
Join date : 2010-07-02
Re: Map Install tutorial
![]() by Dzani Fri Aug 06, 2010 10:33 am
by Dzani Fri Aug 06, 2010 10:33 am
Dzani- Admin
- Posts : 575
Activity Points : 953
Reputation : 87
Join date : 2008-01-10 -
option 1
![]() by Jucho Mon Aug 09, 2010 12:12 pm
by Jucho Mon Aug 09, 2010 12:12 pm
it only says press edit and enter new map name but which name??
wheere do i have to put my downloaded maps??
plz help me and sorry for my bad english

Jucho- Standard Member
- Posts : 1
Activity Points : 1
Reputation : 0
Join date : 2010-08-09
Re: Map Install tutorial
![]() by Dzani Mon Aug 09, 2010 1:01 pm
by Dzani Mon Aug 09, 2010 1:01 pm
Options 1, 2 and 3 are a bit tricky but with them you can add maps without replacing existing ones.
But anyway, just try default option and feel free to ask more questions if you have them.
Dzani- Admin
- Posts : 575
Activity Points : 953
Reputation : 87
Join date : 2008-01-10 -
Re: Map Install tutorial
![]() by mcprojects Thu Oct 14, 2010 12:38 pm
by mcprojects Thu Oct 14, 2010 12:38 pm
I have installed W4map launcher with W3D v.1.085 by alexbond. it's fantastic BUT i ha ve a problem.
Names of players are flickering and this bug is very annoying.
Anyone can help me?
mcprojects- Standard Member
- Posts : 2
Activity Points : 2
Reputation : 0
Join date : 2010-10-13
Re: Map Install tutorial
![]() by Dzani Thu Oct 14, 2010 6:19 pm
by Dzani Thu Oct 14, 2010 6:19 pm
Dzani- Admin
- Posts : 575
Activity Points : 953
Reputation : 87
Join date : 2008-01-10 -
Re: Map Install tutorial
![]() by Fireworm Thu Oct 14, 2010 6:35 pm
by Fireworm Thu Oct 14, 2010 6:35 pm
Fireworm- Standard Member
- Posts : 493
Activity Points : 622
Reputation : 88
Join date : 2010-01-27
Age : 29
Re: Map Install tutorial
![]() by mcprojects Fri Oct 15, 2010 12:36 pm
by mcprojects Fri Oct 15, 2010 12:36 pm
Version 1.00 european.
This happens only in game with the 16:10 resolution. In 4:3 this bug doesn't happens...
mcprojects- Standard Member
- Posts : 2
Activity Points : 2
Reputation : 0
Join date : 2010-10-13
Dzani- Admin
- Posts : 575
Activity Points : 953
Reputation : 87
Join date : 2008-01-10 -
Re: Map Install tutorial
![]() by napVpan Sun Jan 30, 2011 8:16 pm
by napVpan Sun Jan 30, 2011 8:16 pm
could you please bold the things, that should be changed?How Add Map in Worms 4 list:
1. in folder data/maps/ put yourmap.xom, yourhmap.hmp, yourtexturelist.txt
2. in folder data/databanks/ put yourdata.xml0 1 Databank.CustomDetailBank 72 6 Databank.CustomTextureBank 72 Maps\yourtexturelist.txt Databank.MaterialFile 64 BUILDING Databank.Theme 64 NIGHT 64 C01 Heightmap.BaseTexture 64 C03 Heightmap.SecondTexture 64
3. change scripts.xml file in folder data/Tweak0
...
...
...YourMapName 80 txt.yourMapName YourIcon.tga stdvs,wormpot YourFileBaseName 6 0 5 0 165 YourMapName txt.yourMapName 64

napVpan- Standard Member
- Posts : 45
Activity Points : 52
Reputation : 0
Join date : 2011-01-29
Age : 29
Location : Germany
Re: Map Install tutorial
![]() by Dzani Fri Feb 18, 2011 12:25 am
by Dzani Fri Feb 18, 2011 12:25 am
Dzani- Admin
- Posts : 575
Activity Points : 953
Reputation : 87
Join date : 2008-01-10 -
Re: Map Install tutorial
![]() by napVpan Fri Feb 18, 2011 2:44 pm
by napVpan Fri Feb 18, 2011 2:44 pm
Dzani wrote:I don't understand the question here. What do you need help with ? How to install a map?
well the quote just made it senseless. I don´t understand how to do option 2. What should i fill in by myself, and what could stay the same? I think bold (big letters) the things, that should be filled in and a short ecplanation what exactly would help!
napVpan- Standard Member
- Posts : 45
Activity Points : 52
Reputation : 0
Join date : 2011-01-29
Age : 29
Location : Germany
Re: Map Install tutorial
![]() by Dzani Sat Feb 19, 2011 12:58 am
by Dzani Sat Feb 19, 2011 12:58 am
Anyway, in the meantime, try using default option
.
Dzani- Admin
- Posts : 575
Activity Points : 953
Reputation : 87
Join date : 2008-01-10 -
Re: Map Install tutorial
![]() by napVpan Sat Feb 19, 2011 8:24 pm
by napVpan Sat Feb 19, 2011 8:24 pm
no i hate not having all maps in a view :-), I just do nothing with the maps...Dzani wrote:I haven't used that method for some time, so I'll have to check it up. I'll reply after I do it.
Anyway, in the meantime, try using default option
napVpan- Standard Member
- Posts : 45
Activity Points : 52
Reputation : 0
Join date : 2011-01-29
Age : 29
Location : Germany
Re: Map Install tutorial
![]() by Benox.exe Mon Oct 10, 2011 8:06 am
by Benox.exe Mon Oct 10, 2011 8:06 am
Benox.exe- Standard Member
- Posts : 2
Activity Points : 2
Reputation : 0
Join date : 2011-10-10
Page 1 of 2 • 1, 2 ![]()
» WeapTwk tutorial
» Xom view 3.0 tutorial how to do saturn model
» How to write the code tweak :D (tutorial for beginner)
» [Tutorial] Change the names of the weapons
Worms 4 and Ultimate Mayhem tweaking mods :: 3D PC games // Tweaking that we major in :: Worms 4 mayhem :: Tweaking Tutorials
|
|
|