
W4ModLauncher
3 posters
Worms 4 and Ultimate Mayhem tweaking mods :: 3D PC games // Tweaking that we major in :: Worms 4 mayhem :: Tweaking Tools
Page 1 of 1

W4ModLauncher
![]() by Dzani Thu Dec 10, 2009 2:38 pm
by Dzani Thu Dec 10, 2009 2:38 pm
15 Jan 2009 : Current verison : 0.82
+ More details about what file is currently being copied in the loading window
+ The launcher can now copy and restore any game file. For instance, if it finds a folder named "Hud" in your mod folder, then it will copy its whole contents into the original Hud folder.
Download version 0.82 update
Download version 0.82 FULL (download this if you haven't installed a previous version before)
Source code
Unzip this into your Worms 4 Mayhem installation directory, or it will NOT load mods properly.
13 Jan 2008 : version 0.81
+ Fixed bad encoding with xml2twk (newline symbols are not recognized by the standard Windows notepad)
+ Fixed minor bug with xml2twk (writes empty files for non-databanked objects, even though they are not modified)
+ Re-converted WormsTweak and ChaosW4 using the fixed xml2twk
+ xml2twk can now find duplicate properties that don't exist in original tweak and write them using the "+Property" syntax, useful for team weapon and scheme tweaks that add new weapons and schemes
Download version 0.81
13 Jan 2008 : version 0.8
+ Added complete list of supported screen resolutions and refresh rates
+ Added ability to load several mods at once
Download version 0.8
12 Jan 2008 : version 0.7
+ First release
Download version 0.7
Here is a beta version of my current project. It's a launcher that will completely replace the default launcher. It has a few more features (allow screenshots, allow manual camera), and over all, it can load tweaks for you, so no need to save/copy/move tweaks each time you want to play or not with them. Just check the mod you want to play with, and click Play to load it and start the game.
But try to load one of the two mods available. You will notice that the launcher takes some time for loading the tweaks. Obviously, it does much more than simply moving XML files. So, how does it work?
If you want to know, browse into the WormsMods folder, and take a look at the structure of the mods. You will notice that there is no XML file there, only a Tweak folder, and inside of it, folders named WeapTwk, PartTwk, etc..., andinside of them, lots of .TWK files. Maybe you will recognize some of those names, if you already know tweaking a little.
Try to open one of these, with Notepad or any text editor. You will not find XML there, but a kind of script, much easier to understand than XML.
If you still can't understand, I will explain you : each mod has is own folder, and inside of it, a folder for each .xml file which is modified. And inside of this folder, one small .TWK file for each object (weapon, particle, etc...) which will be added or modified.
For example, on the above picture, the file kWeaponBazooka.twk will be read by the launcher, which will apply the modifications to the bazooka (kWeaponBazooka) in WeapTwk.xml. This new tweak management system has many advantages:
- You don't have to waste time for searching your object in huge XML files such as PartTwk.xml.
- Sharing your individual weapons with people is much easier. Just upload your .TWK files and tell people to create an empty mod and throw those files in.
- .TWK files are only needed for objects which are modified. Thus, the size of the whole mod will be much smaller than the full XML file (especially huge files such as PartTwk.xml or Local.xml).
The language used in .TWK files is really simple, much easier to learn and understand than XML. You don't have to worry about opening and closing tags, angle brackets and all this annoying XML stuff.
What you will have to write in a .TWK file is nothing more than a sequence of lines "Property=Value". For example, if you want to set the collision radius of the bazooka shell to 5, you would have to find the <Radius> tag in WeapTwk.xml, and change its value to 5.
code ::
<Radius>5</Radius>
In the .TWK file, just add the line
code ::
Radius=5
Simple, isn't it?
For vectors, colors and references, the "Value" has a particular syntax.
For a vector, you have to write "@vector X Y Z", where X, Y and Z are the components of your vector (you may omit Z if your vector is 2D).
In XML files, vectors are declared like this:
code ::
<Property x='X' y='Y' z='Z' />
For a color, you have to write "@color R G B A", where R, G, B and A are respectively the Red, Green, Blue, and Alpha (opacity) components of your color. You may omit A if you color doesn't have an Alpha components. Also, the values for R, G, B and A may be in the range [0-1] or [0-255]. It depends of the context. If a property has color with a particular format, then give it a color of the same format.
In XML files, colors are declared like this:
code ::
<Property r='R' g='G' b='B' a='A' />
For a reference, you have to write "@href " followed by the name of the object it refers to.
In XML files, references are declared like this:
code ::
<Property href='objectname' />
Examples:
code ::
EmitterOriginOffset=@vector 0 800 0
EmitterOriginRandomise=@vector 0 0 0
ParticleColor=@color 1 0 1
ParticleSize=@vector 80 100
code ::
Weapon=@href DATA.LockedWeapons-2
Also, you may encounter this sometimes:
code ::
<ParticleColor r='1' g='1' b='1' />
<ParticleColor r='1' g='0.8' b='0' />
<ParticleColor r='0.8' g='0.5' b='0.1' />
<ParticleColor r='0.3' g='0.28' b='0.3' />
<ParticleColor r='0.6' g='0.6' b='0.6' />
As you can see, this is a sequence of properties which have the exact same name ! (this is a part of a particle emitter, which holds the different colours the particles will have over time)
The solution in a .TWK file is adding "(n)" to the end of the name of the property, if you want to modify the (n+1)th property. For example, ParticleColor(0) will be the first ParticleColor found in the sequence, ParticleColor(1) will be the second one, ParticleColor(2) the third one, etc...
So the conversion in .TWK language would be:
code ::
ParticleColor=@color 1 1 1
ParticleColor(1)=@color 1 0.8 0
ParticleColor(2)=@color 0.8 0.5 0.1
ParticleColor(3)=@color 0.3 0.28 0.3
ParticleColor(4)=@color 0.6 0.6 0.6
Notice that ParticleColor is identical to ParticleColor(0).
Sometimes, you may want to add such a duplicate property to your object, but you don't know how many times it is repeated. In this case, just put a "+" before the name of your property.
code ::
+ParticleColor=@color 0.3 0.3 0.3
This will add a new ParticleColor property to your object, no matter how many ParticleColor property already exist.
This is for the objects you want to modify which already exist. For objects that do not exist, you will have to create a .TWK file with the name of the object you want to create, and then enter its properties. You have 2 solutions:
-Solution 1 : Create an empty object, and declare ALL its properties.
Just add the keyword "#class " to the beginning of your TWK file, followed by the type of object you want to create (for example, if you want to create a cluster for a weapon, the type should be PayloadWeaponPropertiesContainer).
Then, do not forget to give ALL the properties needed for this object.
-Solution 2 : Copy an existing object, and modify its properties.
Add the keyword "#copy " to the beginning of your TWK file, followed by the name of the object you want to copy. For example, if you want to create a bazooka shell which is twice bigger, without affecting the original bazooka weapon, just create your .TWK file (for example kWeaponBigBazooka.twk), and write this:
code ::
#copy kWeaponBazooka
Scale=2
Radius=10
I guess you already know which solution you should always use. #class should be never used except in very rare cases. Else, it is reserved to the xml2twk converter.
Also, #copy will always copy the object from the original tweak. Thus, you can't copy an object you have created. A #copynew keyword may be added in future versions for copying newly created or modified objects.
You may notice that you don't need to declare the objects you create (If you know advanced tweaking, and how to add your own clusters and particles, you should know that you always have to declare them on the top of the XML file). W4ModLauncher does it automatically for you.
But you may want to create an object without adding it, for example, if you are making new team weapons (those are not declared in the databank, but in a WeaponFactoryCollective object). In this case, just add a new line with the keyword "#nodb" BEFORE "#class" or "#copy".
Finally, let's see the non-container resources, such as integers, strings, floating point values, colors, vectors. You may create one file for each of these resources, and modify the Value property, but that would be kind of... not pratical at all.
The non-container resources have they own common .TWK file. Create a .TWK file, and rename it EXACTLY to "resource.twk".
Inside of this file, write the keyword #int, #uint, #float, #string, #color, or #vector depending on the type of the resource you want to modify/add, then write the modifications the same way as properties : "Resource=Value".
For exemple, if you want to change the duration of the jetpack, you have to create a Tweak folder (for Tweak.xml, because the resource Jetpack.InitFuel is located in Tweak.xml), and write:
code ::
#int
Jetpack.InitFuel=9999999
Any other property modified after the #int keyword will have the type XIntResourceDetails (integer), until you write a new type keyword. For example:
code ::
#int
Value1=10
Value2=15
Value3=42
Value4=35
#float
Value5=3.14
Value6=8.2
#color
Value7=@color 255 255 255 255
Value8=@color 255 0 0 255
#string
Value9=Hello World
Value10=test
Value1~4 are integers, Value5 and Value6 are floating point values, Value7 and Value 8 are colors, and Value9 and Value10 are strings.
W4ModLauncher ignores spaces at the beginning and end of a line, and near a "=" sign. If you think adding spaces and indentation makes the code more readable, you can do it without any problem:
code ::
#string
Value1 = test
Value2 = hello world
#int
Value3 = 2
Value4 = 5
You can add commentaries as well. The syntax for commentaries is the same as for the C language.
code ::
// This is a commentary line
/* This
is
a commentary block */
// Set any model for the payload, and set its scale to 0 to make it invisible.
PayloadGraphicsResourceID=Bazooka.Payload // using the bazooka shell as the model
Scale=0
Finished. Now you know how the .TWK language works. It is really useful for managing and understanding tweaks. For example, if you download a mod from someone else, you will see immediately which objects have been added or modified, and which properties have been changed (which is nearly impossible in a XML file, unless you spend hours to compare the modified file and the original one).
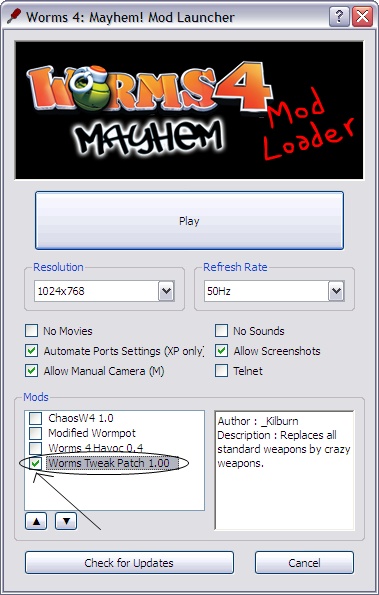
There are two mods in the archive. Those are some of my old tweaks I have converted to .twk files. Worms Tweak Patch is a complete tweak, while Chaos W4 is still very experimental, so a few weapons may not work.
Do not check "Telnet". It's a debugging feature that will make you crash if you try to play online. I will explain what it does later.
I have also created an user-defined language for Notepad++, for the .twk scripts.
Download user-defined language file for Notepad++


Source :http://forum.team17.com/showthread.php?t=35326
Author : _Kilburn

Dzani- Admin

- Posts : 575
Activity Points : 953
Reputation : 87
Join date : 2008-01-10 -

Re: W4ModLauncher
![]() by aguscerdo Tue Jun 14, 2011 6:26 pm
by aguscerdo Tue Jun 14, 2011 6:26 pm
hey i downloaded the mod launcher, but there r no mods, and when playing it is a normal worms,
help me with this :afro:
help me with this :afro:

aguscerdo- Standard Member
- Posts : 15
Activity Points : 36
Reputation : 2
Join date : 2011-05-10
Location : Chile
Re: W4ModLauncher
![]() by FBI Light Rock Thu Jun 16, 2011 10:55 am
by FBI Light Rock Thu Jun 16, 2011 10:55 am
Dzani, there's a newer version of the W4ModLauncher. It's now apparently 0.83. Here's the link...

FBI Light Rock- Standard Member
- Posts : 45
Activity Points : 66
Reputation : 7
Join date : 2011-02-19
Re: W4ModLauncher
![]() by FBI Light Rock Thu Jun 16, 2011 11:22 am
by FBI Light Rock Thu Jun 16, 2011 11:22 am
You need to tick the box beside the tweak's name before W4ModLauncher will activate the tweak for you! But first, did you copy its files and folders to the correct directory? All the files and folders inside the zip folder are to be extracted to the root directory of your Worms 4 game folder, together with the main Worms 4 EXE file.aguscerdo wrote:hey i downloaded the mod launcher, but there r no mods, and when playing it is a normal worms,
help me with this :afro:
FBI Light Rock- Standard Member
- Posts : 45
Activity Points : 66
Reputation : 7
Join date : 2011-02-19
Re: W4ModLauncher
![]() by aguscerdo Thu Jun 16, 2011 1:34 pm
by aguscerdo Thu Jun 16, 2011 1:34 pm
yeah but there is nothing inside the box, i added all the files to the worms folder, not data :affraid:
aguscerdo- Standard Member
- Posts : 15
Activity Points : 36
Reputation : 2
Join date : 2011-05-10
Location : Chile
Re: W4ModLauncher
![]() by FBI Light Rock Thu Jun 16, 2011 2:55 pm
by FBI Light Rock Thu Jun 16, 2011 2:55 pm
aguscerdo wrote:yeah but there is nothing inside the box, i added all the files to the worms folder, not data :affraid:
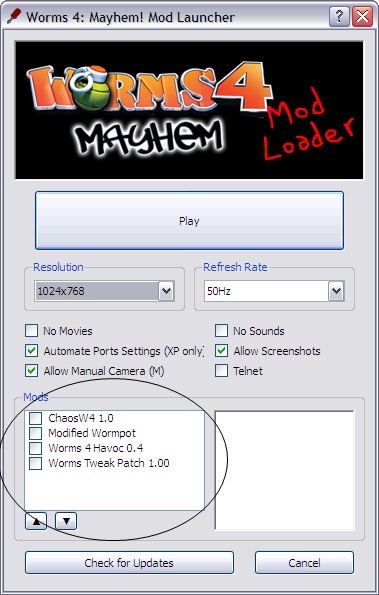
You mean this box? If that's the case, you are possibly missing this particular file in the WormsMods/[Tweak Name]: "info.txt". This file tells the launcher the details of the tweak. Without it, nothing about the tweak appears!
Create this file, and this is the format it follows:
name=_____________ <---Very very important! Must have this or tweak may not appear! The rest are optional.
author=_____________
version=________
desc=______________
FBI Light Rock- Standard Member
- Posts : 45
Activity Points : 66
Reputation : 7
Join date : 2011-02-19
Worms 4 and Ultimate Mayhem tweaking mods :: 3D PC games // Tweaking that we major in :: Worms 4 mayhem :: Tweaking Tools
Page 1 of 1
Permissions in this forum:
You cannot reply to topics in this forum|
|
|